
Talking-head lighting with one COB and one fill
Use one bicolour COB light in a matching softbox as your main light, plus a white reflector or a second smaller light as fill. Put the main light at 45° to the camera, set every light to the same colour temperature, and switch off the ceiling lights.

Buy this as a kit
Ready-made youtube and talking-head kits. Swap any part or change quantities on the kit page.
-
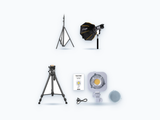 budget · 1 personYouTube talking-head — Budget (bring your camera)
₹26,075Incl. GST
-
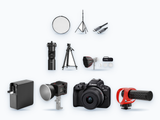 starter · 1 personYouTube talking-head — Starter
₹1,50,524Incl. GST
-
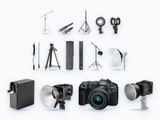 better · 1 personYouTube talking-head — Better
₹3,72,864Incl. GST
Build it
-
Why one COB plus one fill, not a ring light
-
 On request
-

SmallRig 5-in-1 Collapsible Circular Reflector (32")
₹3,100Incl. GST
-
-
The key light: 60 W at a desk, 200 W from further back
-
On request
-

SmallRig RC 220B/220D Pro COB LED Video Light - Quick-Mount Portable
From ₹44,900 Incl. GST -
 On request
Aputure LS 60x LED Video Light
Price on request
-
-
Put a softbox on it
-

SmallRig RA-D30 mini Parabolic Softbox for RC60/100 COB
₹5,400Incl. GST -

SmallRig RA-D85 Parabolic Softbox
₹20,300Incl. GST -
On request
-
SmallRig RC 220B/220D Pro COB LED Video Light - Quick-Mount Portable
From ₹44,900 Incl. GST
-
-
The fill is a reflector until it isn't
-
SmallRig 5-in-1 Collapsible Circular Reflector (32")
₹3,100Incl. GST -
SmallRig RC 220B/220D Pro COB LED Video Light - Quick-Mount Portable
From ₹44,900 Incl. GST -
On request
-

SmallRig RC 30B COB LED Video Light
From ₹12,200 Incl. GST -

SmallRig RA-S280 Air-cushioned Light Stand
₹9,500Incl. GST
-
-
Place it, then freeze it
-

SmallRig RA-S280A Air-cushioned Light Stand with Arm
₹13,500Incl. GST -
SmallRig RA-S280 Air-cushioned Light Stand
₹9,500Incl. GST -
SmallRig RC 220B/220D Pro COB LED Video Light - Quick-Mount Portable
From ₹44,900 Incl. GST
-
-
Match colour, then leave it
-
On request
-
SmallRig RC 220B/220D Pro COB LED Video Light - Quick-Mount Portable
From ₹44,900 Incl. GST -
On request
Aputure LS 60x LED Video Light
Price on request
-
-
Turn off the ceiling lights and take a test shot
-
On request
-
SmallRig 5-in-1 Collapsible Circular Reflector (32")
₹3,100Incl. GST
-


What you need
- One bicolour COB light as your key (main) light: around 60 W at a desk, around 200 W if the light sits 1.5 m away
- A softbox that fits that exact light
- One fill: an 80 cm 5-in-1 reflector, or a second smaller COB light
- An air-cushioned stand for the key, and a second stand (or a helper) for the fill
- A room where you can switch off the ceiling lights
A COB light is a compact LED with one bright chip, and bicolour means you can set its colour anywhere from warm to daylight. A good talking-head look needs one shaped key light, one fill and a camera at eye level. The camera can wait. Two lights you can move beat one expensive panel stuck on the desk.
Why one COB plus one fill, not a ring light
A ring light, or a light on top of the camera, sits right in line with the lens. That leaves no shadows, and without shadows a face looks flat. A COB light placed off to one side, through a softbox, gives a soft shadow beside the nose and around the eyes. The fill decides how dark that shadow is. The balance between key and fill is the whole look.
With a white reflector as fill, you still have two sources: the light and its bounce. A second COB light as fill lets you set a balance you can write down and repeat next week.
The key light: 60 W at a desk, 200 W from further back
The SmallRig RC 60B is a 63 W bicolour COB (2700–6500 K) with very accurate colour: CRI 97+ and TLCI 98+, which means skin looks natural on camera. Its built-in battery of about 49 Wh gives roughly 45 minutes at full power or 75 minutes in eco mode. About 1 m from someone sitting, through a small softbox, it has plenty of power. It is not enough for a large 85 cm softbox 2 m away.
The SmallRig RC 220B Pro gives about 200 W of light output and weighs about 1.65 kg. That is the key for a 1.5 m distance through an 85 cm softbox.
The Aputure LS 60x is a 60 W bicolour light with an adjustable beam. It works best as a focused light or hair light unless you add a softbox using its LS 60 Mini Mount. Skip 300 W lights for a small room. You will run them at 5% and hear the fan.
Put a softbox on it
A bare COB light is harsh and throws hard shadows. A softbox spreads it out. The SmallRig RA-D30 mini parabolic softbox is made for the RC 60B and RC 100B. It opens to about 28 × 22 cm and comes with a diffuser and a honeycomb grid. Use the diffuser at a desk. Add the grid if light is spilling onto a white wall behind you.
The SmallRig RA-D85 is an 85 cm softbox for 200 W class lights. At 1.5 m, that size wraps softly around a face. A powerful light in a small box close up looks the same as a small light in a small box, just hotter and noisier. Box size and distance decide how soft the light is; wattage decides whether you can have both.
Buy the softbox that fits your light. A generic Bowens-mount softbox on an RC 60B needs an extra adapter.
The fill is a reflector until it isn't
A reflector bounces some of your key light back into the shadow side. The SmallRig 5-in-1 collapsible reflector is about 80 cm across and weighs under 500 g. It has white, silver, gold and black sides, plus a white see-through diffusion panel. White, placed opposite the key, is the standard talking-head fill. Use silver only in a very dark room; gold gives a sunset glow you probably do not want on a tutorial. A white reflector still works with the RC 220B Pro at 1.5 m.
If you also want a hair light or a light on the background, add a second SmallRig light (the RC 60B, or the 30 W RC 30B) on an RA-S280 stand behind you. They share the same 2700–6500 K range, so colours match without gels. A reflector gets you most of the way for far less money.
Place it, then freeze it
Place the key light at 45° to one side of the camera, slightly above eye level, pointing down. Put the fill on the other side, lower and dimmer. Keep the camera at eye level.
If a stand shows up in a wide shot, use the SmallRig RA-S280A stand with an arm. It reaches 2.8 m, the arm extends up to 1.7 m, and it holds 5 kg. The RC 220B Pro plus an 85 cm softbox fits within that, but do not hang a second light on the same arm.
The RA-S280 is the straight version without an arm. Both are air-cushioned, so if a section slips it sinks gently instead of crashing down with the light on top. That matters on a bedroom floor.
When the picture looks right, mark the stand feet with tape so the next session starts in the same place.
Match colour, then leave it
Colour temperature is measured in kelvin (K). Lower numbers look warm and orange; higher numbers look cool and blue. The SmallRig COB lights here and the Aputure LS 60x all cover 2700–6500 K. Pick one number and set every light to it:
- 5600 K if a window is in shot
- 4000 K at night, so your light does not clash with warm house lamps
- 3200 K only if the room is already warm-lit and you cannot turn those lights off
The high colour accuracy of these lights (CRI 96 and above) is why skin does not turn green or grey. Do not mix them with a cheap RGB panel as fill unless you have checked both on camera with the same white balance. Once the kelvin is set, set the camera's white balance to match the key light, not to auto.
Turn off the ceiling lights and take a test shot
Ceiling lights add a second shadow under your nose that no fill can remove. Switch them off. Take a test picture first.
- If the shadow under your chin is a black hole, move the fill closer or add the white reflector.
- If your forehead looks shiny and bright, raise the key light or turn it down.
- If the wall behind you is the same tone as your face, add the RC 60B behind you as a hair light, even at 10%, to separate you from the background.
The reflector's black side takes light away if the fill is too strong. Take the test shot with the same camera settings you will film with, not a brighter photo mode. Otherwise you will light for a picture you will not shoot.